How To – RGB To HSI And HSI To RGB Color Model In C#
This guide shows how to convert RGB to HSI image data and also how to convert it back from HSI to RGB to make it displayable on screen.
Filter by Category
This guide shows how to convert RGB to HSI image data and also how to convert it back from HSI to RGB to make it displayable on screen.
Adaptive median filter is much more effective at removing impulse noise, also known as salt and pepper noise, than traditional median filter.
Adaptive local noise reduction filters are useful for processing images that have too much noise to deal with with other simpler filters.
Alpha trimmed mean filter is a combination of mean filters and order-statistic filters. This guide shows how to use them with C#.
Midpoint filter is a order-statistic filter and we use it to process image data in spatial domain. This guide shows how to make it with C#.
Max and min filter is one of the order-statistic filter we can use to process image data in spatial domain. This tutorial shows it with C#.
Median filter is one of the order-statistic filters for processing image data in spatial domain. This guide shows how to apply it with C#.
We can use contraharmonic mean filter to process image data in spatial domain. It's most effective against salt and pepper noise.
Harmonic mean filter is of mean filters we can use to process image data in spatial domain. This guide shows how to apply it with C#.
Geometric mean filter is one of mean filters we can use processing images in spatial domain. We use C# programming language to apply it here.
Welcome to another image processing tutorial, where we’ll learn how to convert RGB to HSI color model and vice versa. Furthermore, we’ll take a look what goes on behind the curtains and develop code for it using C# programming language.
This type of color model is one of the most widely used, because it carries color image data that our computer screens and phones can display. It’s based on Cartesian system, where we can describe colors inside a cube.
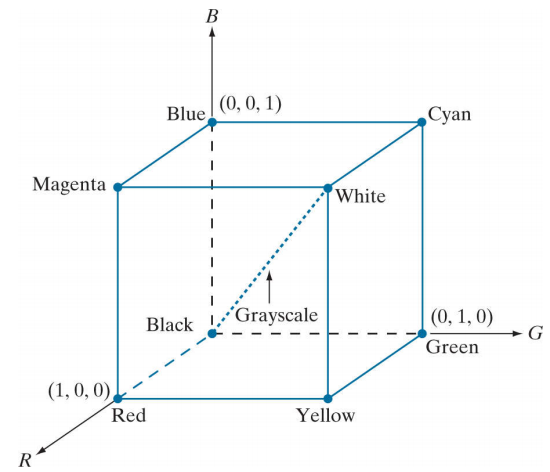
As we can see from the image above, each dimension represents one of the primary colors, red, green and blue. This is also why we call it RGB model.
So to display a color image on our screen, we actually need 3 component images, one for each color channel. In other words, each color image we see on screen is a composite image which consists of component channel images.
When we’re dealing with grayscale images, the values pixels carry are equal across all color channels. To visualize that, we can see from the cube above that all shades of gray lie on a line that connects origin and the point farthest from it.
Therefore, we could classify grayscale as 8-bit images, which means they have pixel depth of 8 bits. On the other hand, when we’re dealing with color images, we have different values across all color channels. Therefore, the pixel depth of a color image is 24 bits.
Other color models like RGB and CYM aren’t good at describing colors in a way that would be practical for human interpretation. HSI color model however, decouples intensity component from color carrying information components. Which gives us ways to display colors closer to our interpretation.
HSI stands for hue, saturation and intensity. Furthermore, hue describes pure color, saturation is a measure how diluted colors are with white light. We’re already familiar with intensity, which is a key factor for describing color sensation. It is also most useful for achromatic or grayscale images.
Converting between the color models requires computing values one pixel at a time. So it may be computationally intensive if we try converting it too many times in a short amount of time. This holds especially for images with larger dimensions.
To avoid dividing by 0, it’s a good practice to add a very small number in denominators of conversion formulas.


The R, G and B variables presented in the formulas above are pixel color channel components – red, green and blue.

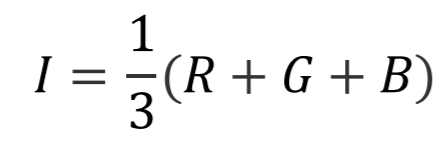
Now with all the formulas we will need, all that’s left for us to do is write the function that will do the job.
public static double[][] RGB2HSI(this Bitmap image)
     {
         int w = image.Width;
         int h = image.Height;
         main.width = w;
         main.height = h;

         BitmapData image_data = image.LockBits(
             new Rectangle(0, 0, w, h),
             ImageLockMode.ReadOnly,
             PixelFormat.Format24bppRgb);
         int bytes = image_data.Stride * image_data.Height;
         byte[] buffer = new byte[bytes];
         Marshal.Copy(image_data.Scan0, buffer, 0, bytes);
         image.UnlockBits(image_data);

         double[][] result = new double[w * h][];
         for (int x = 0; x < w; x++)
         {
             for (int y = 0; y < h; y++)
             {
                 int pos = x * 3 + y * image_data.Stride;
                 int r_pos = x + y * w;
                 result[r_pos] = new double[3];
                 double b = (double)buffer[pos];
                 double g = (double)buffer[pos + 1];
                 double r = (double)buffer[pos + 2];

                 double[] pixel = { r, g, b };
                 double num = 0.5 * (2 * r - g - b);
                 double den = Math.Sqrt(Math.Pow(r - g, 2) + (r - b) * (g - b));

                 double hue = Math.Acos( num / (den));
                 if (b > g)
                 {
                     hue = 2* Math.PI - hue;
                 }

                 num = pixel.Min();
                 den = r + g + b;

                 //if (den == 0)
                 //{
                 //    den = 0.00000001;
                 //}

                 double saturation = 1d - 3d * num / den;
                 if (saturation == 0)
                 {
                     hue = 0;
                 }

                 double intensity = (r + g + b) / 3;

                 result[r_pos][0] = hue;
                 result[r_pos][1] = saturation;
                 result[r_pos][2] = intensity;
             }
         }
         //transpose
         double[][] result_t = new double[3][];
         for (int i = 0; i < 3; i++)
         {
             result_t[i] = new double[w * h];
             for (int j = 0; j < w * h; j++)
             {
                 result_t[i][j] = result[j][i];
             }
         }

         return result_t;
}Now, to turn it back into displayable images we need to turn it back to RGB model. We’ll deal with a lot more angles and trigonometry so we’ll need to be careful we compute everything either in degrees or radians.
It depends on the hue angle, how we’ll compute RGB values. Let’s take a look at the formulas and see what I mean.
For hue angle between 0 and 120 degrees or 2/3 of pi in radians we use following formulas.
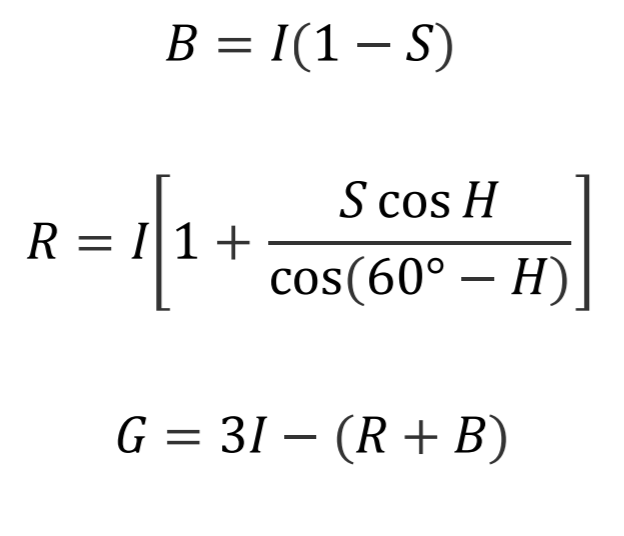
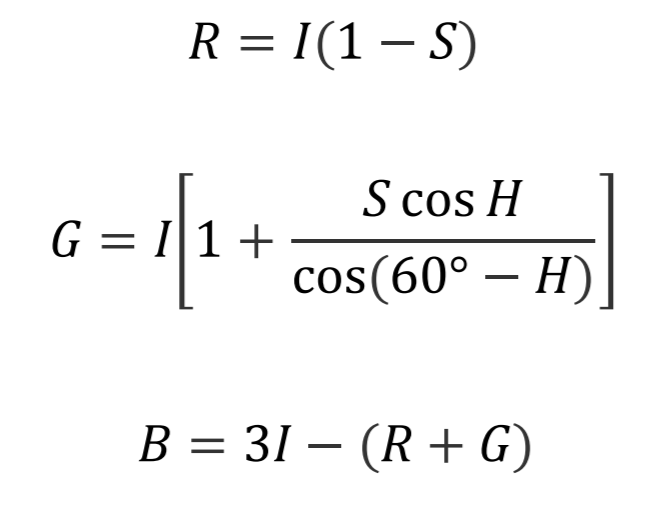
And for hue angle between 120 and 240 degrees. But first we need to subtract 120 degrees from the angle before we input them in the following formulas.
And finally, for hue angle between 240 and 360 degrees. We need to subtract 240 degrees from the angle before we begin.
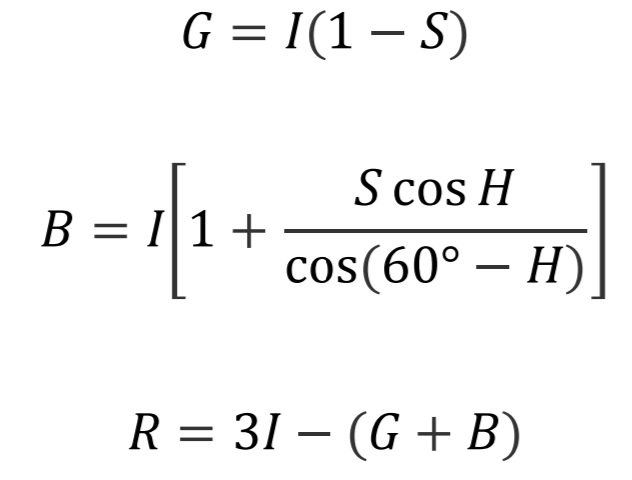
Okay, this is all the formulas we’re going to need to convert from HSI to RGB model. Let’s take a look at the code that will do all the work.
public static Bitmap HSI2RGB(this double[][] hsi_map)
     {
         int w = main.width;
         int h = main.height;

         Bitmap image = new Bitmap(w, h);
         BitmapData image_data = image.LockBits(
             new Rectangle(0, 0, w, h),
             ImageLockMode.WriteOnly,
             PixelFormat.Format24bppRgb);
         int bytes = image_data.Stride * image_data.Height;
         byte[] result = new byte[bytes];
         for (int x = 0; x < w; x++)
         {
             for (int y = 0; y < h; y++)
             {
                 int pos = x * 3 + y * image_data.Stride;
                 int hsi_pos = x + y * w;
                 double H = hsi_map[0][hsi_pos];
                 double S = hsi_map[1][hsi_pos];
                 double I = hsi_map[2][hsi_pos];
                 byte red = 0;
                 byte green = 0;
                 byte blue = 0;

                 if (H >= 0 && H < 2*Math.PI/3)
                 {
                     blue = (byte)(I * (1 - S));
                     red = (byte)(I * (1 + S * Math.Cos(H / Math.Cos(Math.PI / 3 - H))));
                     green = (byte)(3 * I - (red + blue));
                 }

                 else if (H >= 2*Math.PI/3 && H < 4*Math.PI/3)
                 {
                     red = (byte)(I * (1 - S));
                     green = (byte)(I * (1 + S * Math.Cos(H - 2 * Math.PI / 3) / Math.Cos(Math.PI - H)));
                     blue = (byte)(3 * I - (red + green));
                 }

                 else if (H >= 4*Math.PI/3 && H < 2*Math.PI)
                 {
                     green = (byte)(I * (1 - S));
                     blue = (byte)(I * (1 + S * Math.Cos(H - 4 * Math.PI / 3) / Math.Cos(5 * Math.PI / 3 - H)));
                     red = (byte)(3 * I - (green + blue));
                 }

                 result[pos] = blue;
                 result[pos + 1] = green;
                 result[pos + 2] = red;
             }
         }
         Marshal.Copy(result, 0, image_data.Scan0, bytes);
         image.UnlockBits(image_data);
         return image;
     }
As you probably noticed, I used angles in radians. This is because the functions calculate angles in radians so there’s no way around this but to convert from degrees to angles in case you’re using them.
This tutorial was quite exhaustive no doubt, but I assure you the understanding we can get from it will pay off in the following tutorials on processing color images.
I hope this guide was helpful. You can also download the demo project and play around with the values.