How To Make Adaptive Median Filter For Images With C#
Adaptive median filter is much more effective at removing impulse noise, also known as salt and pepper noise, than traditional median filter.
Filter by Category
Adaptive median filter is much more effective at removing impulse noise, also known as salt and pepper noise, than traditional median filter.
Adaptive local noise reduction filters are useful for processing images that have too much noise to deal with with other simpler filters.
Alpha trimmed mean filter is a combination of mean filters and order-statistic filters. This guide shows how to use them with C#.
Midpoint filter is a order-statistic filter and we use it to process image data in spatial domain. This guide shows how to make it with C#.
Max and min filter is one of the order-statistic filter we can use to process image data in spatial domain. This tutorial shows it with C#.
Median filter is one of the order-statistic filters for processing image data in spatial domain. This guide shows how to apply it with C#.
We can use contraharmonic mean filter to process image data in spatial domain. It's most effective against salt and pepper noise.
Harmonic mean filter is of mean filters we can use to process image data in spatial domain. This guide shows how to apply it with C#.
Geometric mean filter is one of mean filters we can use processing images in spatial domain. We use C# programming language to apply it here.
Arithmetic mean filter is one of the simplest mean filters we could use to reduce noise from an image. Learn more about spatial filtering.
We can use adaptive median filter for processing image data when traditional median filter fails to do the job. Furthermore, it can also preserve details and smooths non-impulsive noise from images.
Like any other spatial filter, it acts as a small window which encompasses a set of intensities on an image. Whatever the position on the image, it takes those intensity values and computes a new output one.
So to render the entire output image, we need to move it across the entire input image, one pixel at a time. In addition to that, it’s also more complicated, which means it needs more time to get the job done.
Adaptive filters change behaviour based on statistical characteristics of intensities inside filter region. This is also the reason why they have superior performance. However, they are still useful just for images which have only noise degradation.
Just like traditional median filter, is this also really good for removing salt and pepper noise. But this one is much better for this job. While traditional filter can’t handle impulse noise with probability distribution above 20 percent, adaptive median filter still works above that.
Adaptive filters, in general, work for multiple types of noises. So, while this filter works great for salt and pepper noise, it also preserves detail when smoothing other types of noises.
Adaptive median filter has quite complicated filter operations in comparison to other adaptive filter. Furthermore, it includes filter size increase during these operations, which is a kind of a special thing for this filter.
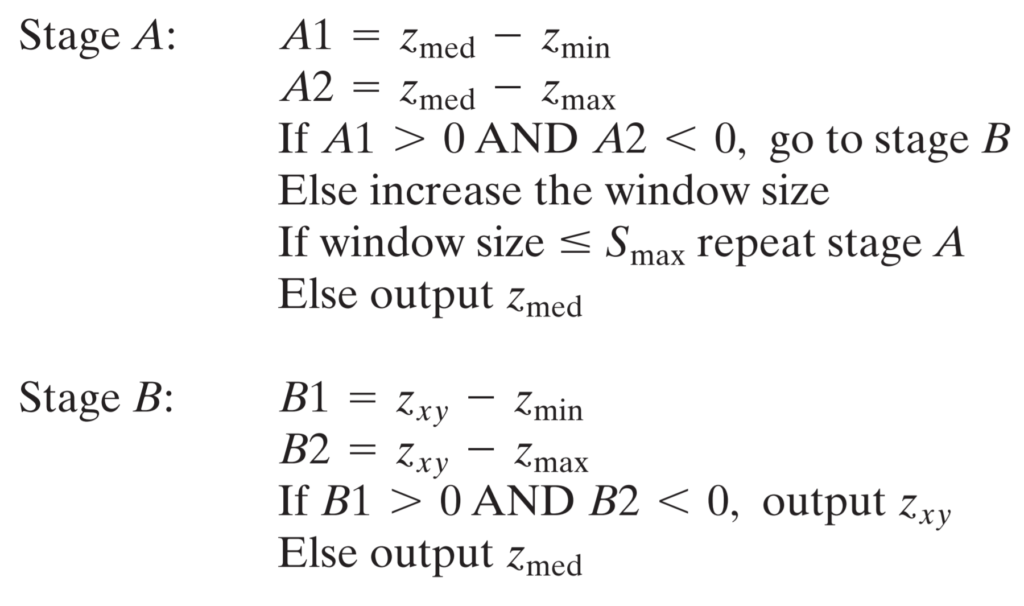
Filter operations work in two stages, which we can see from the following pseudo code.

Okay, let’s break it down. We’ll start with z variables, which represent intensity values. Furthermore, as we can see, they all have extra notations. So med notation stands for median, which represents the median value inside the filter.
We can also see that there are min and max, which are lowest and highest value inside the filter region. And lastly, xy notation represents the intensity value positioned on the x and y coordinates. It also has position in the center of the filter.
Another unknown is Smax, which represents maximum filter size. This is important because of the increasing filter size thing.
public static Bitmap Filter(this Bitmap image, int rmax)
     {
         int w = image.Width;
         int h = image.Height;

         BitmapData image_data = image.LockBits(
             new Rectangle(0, 0, w, h),
             ImageLockMode.ReadOnly,
             PixelFormat.Format24bppRgb);
         int bytes = image_data.Stride * image_data.Height;
         byte[] buffer = new byte[bytes];
         Marshal.Copy(image_data.Scan0, buffer, 0, bytes);
         image.UnlockBits(image_data);

         int r = 3;
         int wres = w - 2 * r;
         int hres = h - 2 * r;
         Bitmap result_image = new Bitmap(wres, hres);
         BitmapData result_data = result_image.LockBits(
             new Rectangle(0, 0, wres, hres),
             ImageLockMode.WriteOnly,
             PixelFormat.Format24bppRgb);
         int res_bytes = result_data.Stride * result_data.Height;
         byte[] result = new byte[res_bytes];

         for (int x = r; x < w - r; x++)
         {
             for (int y = r; y < h - r; y++)
             {
                 int pixel_location = x * 3 + y * image_data.Stride;
                 int res_pixel_loc = (x - r) * 3 + (y - r) * result_data.Stride;
                 byte[][] neighborhood = new byte[3][];

                 for (int c = 0; c < 3; c++)
                 {
                     neighborhood[c] = new byte[(int)Math.Pow(2 * r + 1, 2)];
                     int added = 0;

                     for (int kx = -r; kx <= r; kx++)
                     {
                         for (int ky = -r; ky <= r; ky++)
                         {
                             int kernel_pixel = pixel_location + kx * 3 + ky * image_data.Stride;
                             neighborhood[c][added] = buffer[kernel_pixel + c];
                             added++;
                         }
                     }
                 }

                 for (int c = 0; c < 3; c++)
                 {
                     if (neighborhood[c].median() > neighborhood[c].Min() && neighborhood[c].median() < neighborhood[c].Max())
                     {
                         if (neighborhood[c].Min() < buffer[pixel_location + c] && buffer[pixel_location + c] < neighborhood[c].Max())
                         {
                             result[res_pixel_loc + c] = buffer[pixel_location + c];
                         }

                         else
                         {
                             result[res_pixel_loc + c] = (byte)neighborhood[c].median();
                         }
                     }

                     else
                     {
                         r++;
                         x = r;
                         y = r;

                         if (r > rmax)
                         {
                             result[res_pixel_loc + c] = (byte)neighborhood[c].median();
                         }
                     }
                 }
             }
         }

         Marshal.Copy(result, 0, result_data.Scan0, res_bytes);
         result_image.UnlockBits(result_data);
         return result_image;
     }
This filter aims to remove salt and pepper noise, smooths other noises while preserving details. It also reduces distortions like thickening or thinning.
I hope this guide was helpful. You can also download the project and try it out on your own images.