How To Make Rayleigh Noise On Image – C# Guide
Rayleigh noise is one of the noise models with which we can simulate data corruption. Guide to making noise from PDF and image histogram.
Filter by Category
Rayleigh noise is one of the noise models with which we can simulate data corruption. Guide to making noise from PDF and image histogram.
Gaussian noise on images is generated with Gaussian probability distribution function. It simulates noise that appears in practice.
We can use notch filters for attenuating frequencies on custom locations across the frequency map. But for that we will need to utilize all of the knowledge we’ve acquired...
Bandpass filters are the counterpart of bandreject filters. Therefore, they attenuate every frequency outside the ring. In case you’re just tuning in, let me clarify what I...
We use bandreject filters to attenuate a ring of frequencies around the center of a 2 dimensional frequency map. Now what does all that mean? We’re going to focus on...
We use Laplacian filter to sharpen images. We are going to talk about the details how exactly this filter works. In essence, it’s one of the highpass filters, which...
Gaussian highpass filter processes images in frequency domain. It attenuates low frequencies without creating ringing artifacts.
Butterworth highpass filter is used to filter images in frequency domain. We can control how smooth transition beyond cut off frequency.
Ideal highpass filter is used to filter images in the frequency domain. It attenuates low frequencies and keeps high frequencies.
We’ve talked about ideal lowpass filter and Butterworth lowpass filter already. And now, we shall get to know the last type of lowpass filters, which is Gaussian lowpass...
We can generate Rayleigh noise on images by using Rayleigh probability density function. Some authors have also named it probability distribution function.
We already described the process of adding Gaussian noise to images. Similarly, we distribute Rayleigh noise values with a probability distribution function. But there are a few things we should mention to make it work properly.
However, before we get into details of how to generate Rayleigh noise, we should mention why would we do that in the first place.
When we’re acquiring images, taking photos, our image could end up corrupted, noisy. Reasons for this could be numerous of things. But the most common ones are because of low quality equipment and environment conditions.
If we use an old camera, which might get easily affected by lightning and temperature changes, there’s a chance our image might get some unwanted artifacts. Also, when we transmit data wirelessly, our signal could be corrupted by atmospheric disturbances.
So artificially generating noise on images allows us to simulate it and use the correct filter to remove it. This way we could end up with the image that’s almost the same as the original.
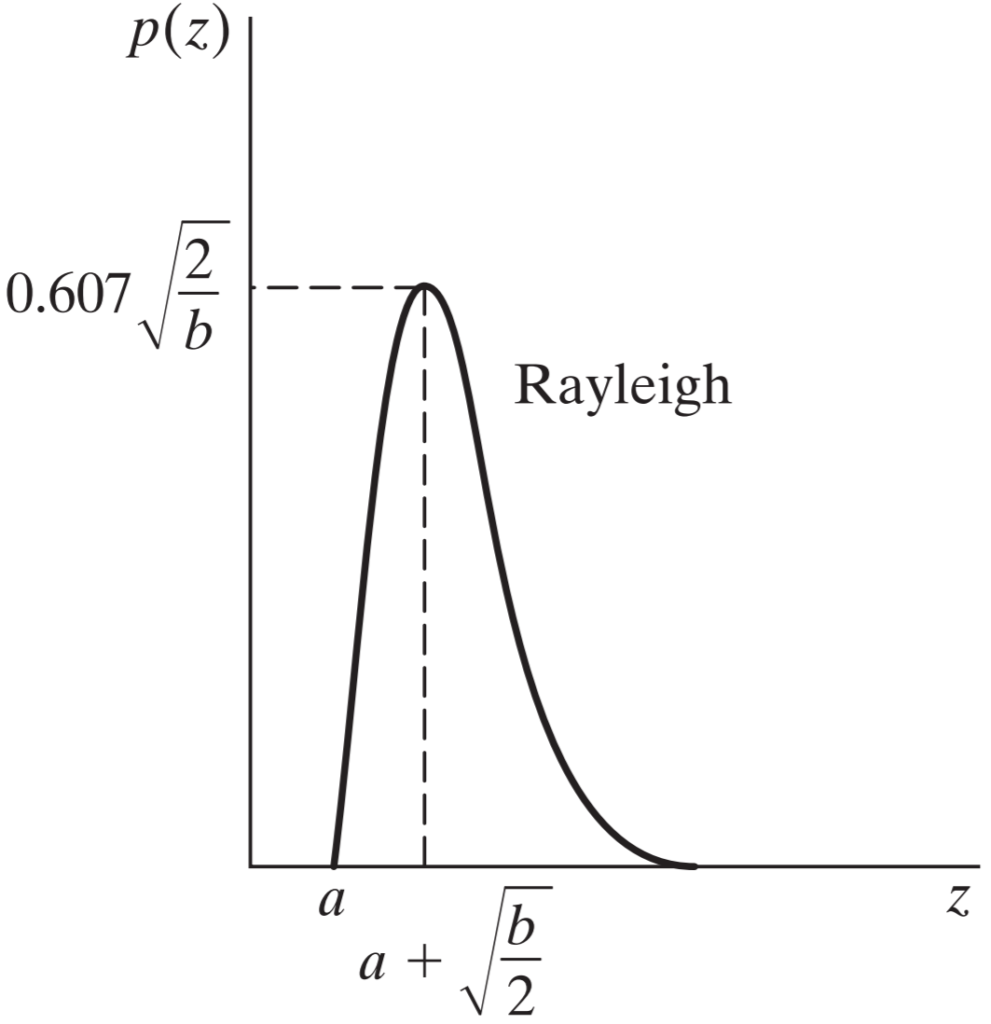
Rayleigh distribution is similar to Gaussian, but only on one side of it. Formulation for probability distribution function allows us to move the entire distribution along horizontal axis. We can see this gap in front from the following graph.
To explain the values on the graph below, horizontal axis shows intensity values and vertical axis shows it’s plotted distribution. Essentially we’re looking to get this kind of pattern on a histogram.

As we can see from the graph and following PDF formula that the parameter a is responsible for translating distribution along horizontal axis. The default values for this distribution are a = 0 and b = 1. Therefore, by default we wouldn’t get that gap in the first few intensity values.

I wrote a function which adds Rayleigh noise to the image. Firstly, we make an array of probabilities for each intensity according to the probability distribution function above. Secondly, we take those values and distribute them in an array containing all intensities below the curve. And finally, we scramble the array and add it with the original image.

You can examine the process in the code below.
public static Bitmap RayleighNoise(this Bitmap image)
     {
         int w = image.Width;
         int h = image.Height;

         BitmapData image_data = image.LockBits(
             new Rectangle(0, 0, w, h),
             ImageLockMode.ReadOnly,
             PixelFormat.Format24bppRgb);
         int bytes = image_data.Stride * image_data.Height;
         byte[] buffer = new byte[bytes];
         byte[] result = new byte[bytes];
         Marshal.Copy(image_data.Scan0, buffer, 0, bytes);
         image.UnlockBits(image_data);

         byte[] noise = new byte[bytes];
         double[] rayleigh = new double[256];

         double a = 0;
         double b = 0.4;

         Random rnd = new Random();
         double sum = 0;

         for (int i = 0; i < 256; i++)
         {
             double step = (double)i * 0.01;
             if (step >= a)
             {
                 rayleigh[i] = (double)((2 / b) * (step - a) * Math.Exp(-Math.Pow(step - a, 2) / b));
             }
             else
             {
                 rayleigh[i] = 0;
             }
             sum += rayleigh[i];
         }

         for (int i = 0; i < 256; i++)
         {
             rayleigh[i] /= sum;
             rayleigh[i] *= bytes;
             rayleigh[i] = (int)Math.Floor(rayleigh[i]);
         }

         int count = 0;
         for (int i = 0; i < 256; i++)
         {
             for (int j = 0; j < (int)rayleigh[i]; j++)
             {
                 noise[j + count] = (byte)i;
             }
             count += (int)rayleigh[i];
         }

         for (int i = 0; i < bytes - count; i++)
         {
             noise[count + i] = 0;
         }

         noise = noise.OrderBy(x => rnd.Next()).ToArray();

         for (int i = 0; i < bytes; i++)
         {
             result[i] = (byte)(buffer[i] + noise[i]);
         }

         Bitmap result_image = new Bitmap(w, h);
         BitmapData result_data = result_image.LockBits(
             new Rectangle(0, 0, w, h),
             ImageLockMode.WriteOnly,
             PixelFormat.Format24bppRgb);
         Marshal.Copy(result, 0, result_data.Scan0, bytes);
         result_image.UnlockBits(result_data);
         return result_image;
}This project not only shows how to add the Rayleigh noise to an image, it shows how to create noise from a probability distribution function. You can download the project and examine the code yourself.
I hope this post proved to be helpful and I would appreciate if you shared it with others.