How To Make Marr Hildreth Edge Detection Algorithm In C#
Marr hildreth edge detection process is one of the earliest sophisticated edge detection based segmentation operations in image processing.
Filter by Category
Marr hildreth edge detection process is one of the earliest sophisticated edge detection based segmentation operations in image processing.
Edge detection is a segmentation technique in image processing for extracting object boundaries based on abrupt intensity changes.
Line detection is a segmentation technique in image processing, with which we can extract thin lines with respect to each filter kernel.
Point detection is a segmentation technique in image processing, we can use to get the position of point objects in the image.
Texture segmentation is a customizable morphological process, with which we can find boundaries between regions based on their texture content
Granulometry is a grayscale morphological operation in image processing for estimating distribution of different sized particles.
Top hat transformation is a grayscale morphological operation in image processing, we can use for extraction of certain objects in the image.
Morphological gradient is a grayscale morphological operation in image processing, which emphasized boundaries and supresses homogenous areas
Morphological smoothing is an image processing technique, which includes grayscale erosion and dilation, and grayscale opening and closing
Automatic algorithm for filling holes is a sequence of morphological operations in reconstruction branch, which fills all holes in the image.
Marr Hildreth edge detection process is one of the earliest attempts at more complex analysis in edge detection processes. Therefore, this operation belongs among edge detection based segmentation processes.
In the heart of this process is convolution, just like all other segmentation operations we covered thus far. However, with this one, we can tune the size of the kernel we’re convolving the image with.
Depending on the size of the kernel we’re going to use, we can adjust it for image data to get optimal results. In other words, large operators detect blurry edges and small ones detect fine detail.
In case you’re not familiar how convolution works, I’m going to try and explain it as quickly as possible here. So basically, we place a kernel (small matrix) on top of the image, multiply the overlapping values and summing them all together. This sum represents the resulting pixel value.
In order to render the entire image, we need to slide this kernel pixel by pixel across the input image.
We’re going to use a combination of two basic spatial operations, which are Gaussian blurring and Laplacian. We can also generate one kernel from these two by convolving Laplacian across Gaussian kernel.
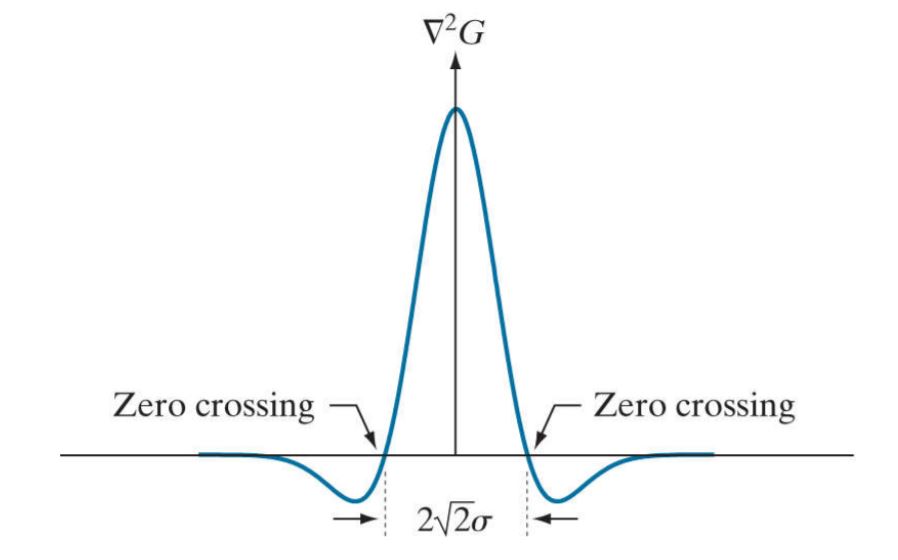
We also call this type of kernel Laplacian of Gaussian kernel or sometimes Mexican hat operator, because of its shape. Like all others edge detection kernels, this one also need to contain coefficients that sum to 0. Reason behind this is that its response is 0 on areas with constant intensity.
There’s a way of simplifying this process though. The way we can go about this whole process is by separating it into parts.
Firstly, we need to apply Gaussian. Secondly we apply Laplacian to the resulting image from Gaussian. And lastly, we need to get the zero crossings from resulting image to extract the locations of the edges.
Now hold on a second, what are these zero crossings we just mentioned?

Zero crossings lie on a circle around the center, of which radius is square root of 2 times sigma – space constant. This sigma is also the standard deviation of the Gaussian function and its a fixed value when we use it to generate Gaussian kernel.
Next question is, what Gaussian kernel size is the most optimal?
First of all, we need to use an odd number for its dimension. But we also need to set it to an integer number, which would be the ceiling, smallest integer that is not smaller than 6 times sigma. Therefore the kernel dimensions would be 6sigma x 6sigma.
As you can see from the following code, first thing I did was calculate space constant value for the Gaussian kernel. I also use zero padding to add a border of black pixels around the image. Reason for that is so our output image will be the same size as input one.
Next step is to normalize pixel values to range between 0 and 1 by dividing them with maximum value in the image.
After this, I applied convolution of Gaussian and Laplacian.
public static double[] Convolute(this double[] buffer, BitmapData image_data, double[,] filter)
     {
         double[] result = new double[buffer.Length];
         int ho = (filter.GetLength(0) - 1) / 2;
         int vo = (filter.GetLength(1) - 1) / 2;

         for (int x = ho; x < image_data.Width - ho; x++)
         {
             for (int y = vo; y < image_data.Height - vo; y++)
             {
                 int position = x * 3 + y * image_data.Stride;
                 double sum = 0;
                 for (int i = -ho; i <= ho; i++)
                 {
                     for (int j = -vo; j <= vo; j++)
                     {
                         int filter_position = position + i * 3 + j * image_data.Stride;
                         sum += (buffer[filter_position] * filter[i + ho, j + vo]);
                     }
                 }
                 for (int c = 0; c < 3; c++)
                 {
                     if (sum > 1)
                     {
                         sum = 1;
                     }

                     result[position + c] = sum;
                 }
             }
         }

         return result;
     }

     public static double[,] GaussianKernel(double sigma)
     {
         int kernel_dim = (int)Math.Ceiling(sigma * 6);
         if (kernel_dim % 2 == 0)
         {
             kernel_dim++;
         }

         double[,] kernel = new double[kernel_dim, kernel_dim];
         double kernelSum = 0;
         int foff = (kernel_dim - 1) / 2;

         for (int x = -foff; x <= foff; x++)
         {
             for (int y = -foff; y <= foff; y++)
             {
                 double temp = (Math.Pow(x, 2) + Math.Pow(y, 2)) / (2 * Math.Pow(sigma, 2));
                 kernel[x + foff, y + foff] = Math.Exp(-temp);
                 kernelSum += kernel[x + foff, y + foff];
             }
         }

         //normalize values, so all together sum to 1

         for (int x = 0; x < kernel_dim; x++)
         {
             for (int y = 0; y < kernel_dim; y++)
             {
                 kernel[x, y] = kernel[x, y] / kernelSum;
             }
         }

         return kernel;
     }
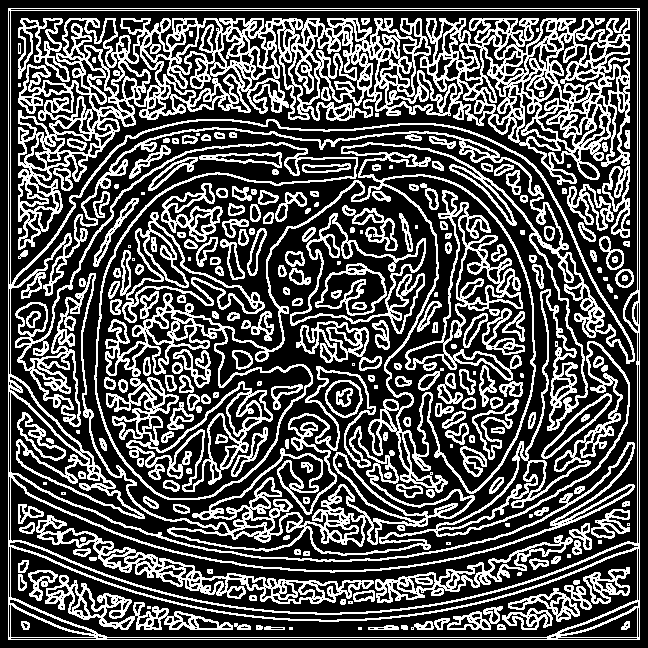
And lastly, I extracted zero crossings and applied thresholding. As you can see, I set a positive zero crossing threshold. Reason for that is so we don’t get the spaghetti effect and filter out the unnecessary edges.

public static Bitmap MarrHildrethEdgeDetect(this Bitmap image)
     {
         int w = image.Width;
         int h = image.Height;

         double sigma = Math.Min(w, h) * 0.005;
         int kernel_dim = (int)Math.Ceiling(sigma * 6);

         if (kernel_dim % 2 == 0)
         {
             kernel_dim++;
         }

         int off = (kernel_dim - 1) / 2;

         Bitmap padded = image.Pad(off);
         w = padded.Width;
         h = padded.Height;

         BitmapData image_data = padded.LockBits(
             new Rectangle(0, 0, w, h),
             ImageLockMode.ReadOnly,
             PixelFormat.Format24bppRgb);

         int bytes = image_data.Stride * image_data.Height;
         byte[] buffer = new byte[bytes];

         Marshal.Copy(image_data.Scan0, buffer, 0, bytes);
         padded.UnlockBits(image_data);

         double[] converted = buffer.Select(x => (double)x).ToArray();
         double max = 0;
         for (int i = 0; i < bytes; i++)
         {
             max = Math.Max(Math.Abs(converted[i]), max);
         }

         for (int i = 0; i < bytes; i++)
         {
             converted[i] = converted[i] / max;
         }

         double[] result = converted.Convolute(image_data, GaussianKernel(sigma));
         result = result.Convolute(image_data, Filters.Laplacian);

         byte[] byte_res = new byte[bytes];

         //find zero crossing
         for (int x = 1; x < w - 1; x++)
         {
             for (int y = 1; y < h - 1; y++)
             {
                 int position = x * 3 + y * image_data.Stride;
                 bool zero_crossing = false;
                 for (int i = -1; i <= 1; i++)
                 {
                     for (int j = -1; j <= 1; j++)
                     {
                         int filter_pos = position + i * 3 + j * image_data.Stride;
                         int counter_pos = position - i * 3 - j * image_data.Stride;
                         if (Math.Sign(result[filter_pos]) != Math.Sign(result[counter_pos]) && result[position] != 0)
                         {
                             double a = Math.Abs(result[filter_pos]);
                             double b = Math.Abs(result[counter_pos]);

                             if (Math.Max(a, b) - Math.Min(a, b) >= 0.008)
                             {
                                 zero_crossing = true;
                             }

                         }
                     }
                 }
                 if (zero_crossing)
                 {
                     for (int c = 0; c < 3; c++)
                     {
                         byte_res[position + c] = 255;
                     }
                 }
             }
         }

         Bitmap res_img = new Bitmap(w, h);
         BitmapData res_data = res_img.LockBits(
             new Rectangle(0, 0, w, h),
             ImageLockMode.WriteOnly,
             PixelFormat.Format24bppRgb);
         Marshal.Copy(byte_res, 0, res_data.Scan0, bytes);
         res_img.UnlockBits(res_data);

         return res_img;
}I hope this tutorial was helpful in giving you a better understanding of Marr Hildreth edge detection process. This is the whole purpose of why I make these guides, so someone out there might find them useful.
You can also download the demo project and try it out yourself.