How To Make Texture Segmentation Work With C#
Texture segmentation is a customizable morphological process, with which we can find boundaries between regions based on their texture content
Filter by Category
Texture segmentation is a customizable morphological process, with which we can find boundaries between regions based on their texture content
Granulometry is a grayscale morphological operation in image processing for estimating distribution of different sized particles.
Top hat transformation is a grayscale morphological operation in image processing, we can use for extraction of certain objects in the image.
Morphological gradient is a grayscale morphological operation in image processing, which emphasized boundaries and supresses homogenous areas
Morphological smoothing is an image processing technique, which includes grayscale erosion and dilation, and grayscale opening and closing
Automatic algorithm for filling holes is a sequence of morphological operations in reconstruction branch, which fills all holes in the image.
Opening by reconstruction is a morphological operation in image processing for removing small objects and recovering shape accurately after.
Geodesic dilation and erosion are fundamental morphological reconstruction algorithms which yield the same result if left to converge.
Pruning in image processing is a morphological operation for removing spurs. It serves mainly as a post processing technique for cleaning up.
Skeletonization is a morphological process in image processing, which extracts the center lines of all shapes, which look like their skeleton
Texture segmentation is a custom procedure for separating image regions according to their textural content. In other words, its a sequence of morphological operations, which we select for particular image data we’re dealing with.
First of all, morphological operations are non-linear operations, which means we don’t calculate new values. The way it works is that we slide a structuring element across the image, while comparing overlaping pixel intensities.
Secondly, we can use two fundamental operations, which are grayscale erosion and dilation. Therefore, any other morphological operation is basically a combination of these two.
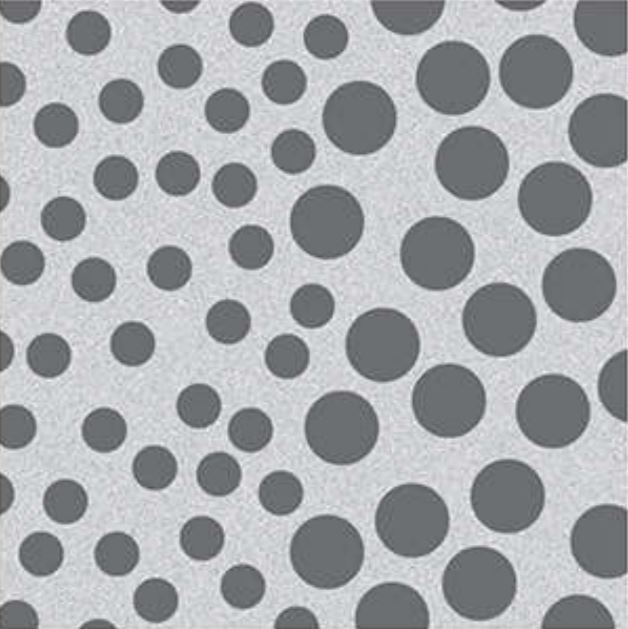
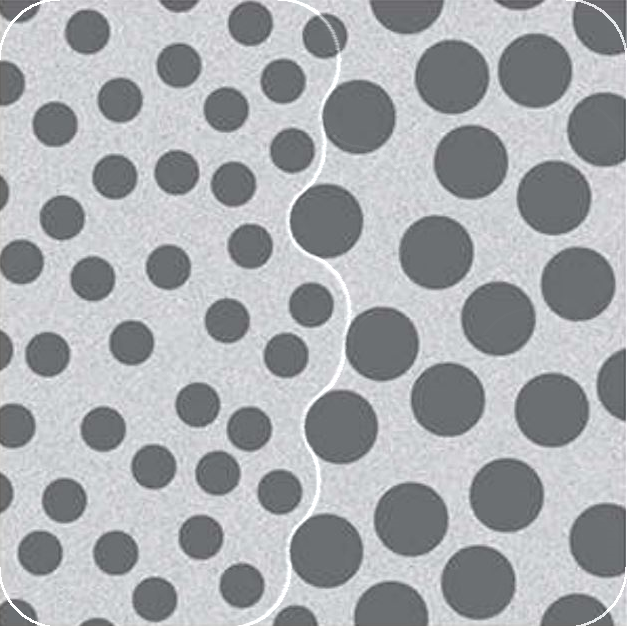
This tutorial will also serve as a stepping stone to segmentation in image processing. Therefore, the objective for our example will be to find the boundary between two regions. These regions have dark circles of different sizes and we will draw a line separating them.

Firstly, we will need to apply grayscale closing with a structuring element that is larger than the smaller circles and smaller than the larger circles. This will result in an image that contains only larger circles.
For the next step, we’re going to apply opening on the resulting image from closing. This will cause the darker circles to fuse together.
For the third step in this process, we’re going to apply morphological gradient, which will result in image with emphasized edges and suppressed homogenous areas. In other words, we’re going to extract the edges.
And for our final step of the way, we’re going to impose these edges on the original image. I basically just added together values from both images. However, I needed to cap summing results so the byte values wouldn’t exceed 255.

In case you’re not familiar with erosion and dilation, I suggest you check out other posts on morphological processing. However, I’m going to introduce a modified versions of these two processes, which will work for circular structuring elements.
I’m also including the function that creates a circular structuring element for radius of your choice.
public static int[,] RadialStructuringElement(int radius)
         {
             int se_dim = radius * 2 + 1;
             int[,] result = new int[se_dim, se_dim];
             for (int i = 0; i < se_dim; i++)
             {
                 for (int j = 0; j < se_dim; j++)
                 {
                     double p = Math.Sqrt(Math.Pow(i - radius, 2) + Math.Pow(j - radius, 2));
                     result[i, j] = p <= radius ? 1 : 0;
                 }
             }
         return result;
     }
Following function for erosion and dilation take the whole array for structuring element, instead of just a dimension of it.
public static byte[] Erode(this byte[] buffer, BitmapData image_data, int[,] structuring_element)
     {
         byte[] result = new byte[buffer.Length];
         int o = (structuring_element.GetLength(0) - 1) / 2;

         for (int x = o; x < image_data.Width - o; x++)
         {
             for (int y = o; y < image_data.Height - o; y++)
             {
                 int position = x * 3 + y * image_data.Stride;
                 byte val = buffer[position];
                 for (int i = -o; i <= o; i++)
                 {
                     for (int j = -o; j <= o; j++)
                     {
                         int se_pos = position + i * 3 + j * image_data.Stride;
                         if (structuring_element[i + o, j + o] == 1)
                         {
                             val = Math.Min(val, buffer[se_pos]);
                         }
                     }
                 }

                 for (int c = 0; c < 3; c++)
                 {
                     result[position + c] = val;
                 }
             }
         }
         return result;
     }

     public static byte[] Dilate(this byte[] buffer, BitmapData image_data, int[,] structuring_element)
     {
         byte[] result = new byte[buffer.Length];
         int o = (structuring_element.GetLength(0) - 1) / 2;
         for (int x = o; x < image_data.Width - o; x++)
         {
             for (int y = o; y < image_data.Height - o; y++)
             {
                 int position = x * 3 + y * image_data.Stride;
                 byte val = buffer[position];
                 for (int i = -o; i <= o; i++)
                 {
                     for (int j = -o; j <= o; j++)
                     {
                         int se_pos = position + i * 3 + j * image_data.Stride;
                         if (structuring_element[i + o, j + o] == 1)
                         {
                             val = Math.Max(val, buffer[se_pos]);
                         }
                     }
                 }

                 for (int c = 0; c < 3; c++)
                 {
                     result[position + c] = val;
                 }
             }
         }

         return result;
     }
And finally, following code shows the entire procedure we described above. However, you will be able to see it all adds up to a quite long sequence and it might take a while to process the image.
public static Bitmap TextureSegmentation(this Bitmap image)
     {
         image = image.Pad(60);

         int w = image.Width;
         int h = image.Height;

         BitmapData image_data = image.LockBits(
             new Rectangle(0, 0, w, h),
             ImageLockMode.ReadOnly,
             PixelFormat.Format24bppRgb);
         int bytes = image_data.Stride * image_data.Height;
         byte[] buffer = new byte[bytes];
         byte[] result = new byte[bytes];
         Marshal.Copy(image_data.Scan0, buffer, 0, bytes);
         image.UnlockBits(image_data);

         //closing
         result = buffer.Dilate(image_data, RadialStructuringElement(30));
         result = result.Erode(image_data, RadialStructuringElement(30));

         //opening
         result = result.Erode(image_data, RadialStructuringElement(60));
         result = result.Dilate(image_data, RadialStructuringElement(60));

         //gradient
         byte[] temp = new byte[bytes];
         temp = result.Dilate(image_data, 3);
         result = result.Erode(image_data, 3);
         for (int i = 0; i < bytes; i++)
         {
             temp[i] -= result[i];
             int summed = buffer[i] + temp[i];
             if (summed > 255)
             {
                 summed = 255;
             }
             result[i] = (byte)summed;
         }

         Bitmap res_img = new Bitmap(w, h);
         BitmapData res_data = res_img.LockBits(
             new Rectangle(0, 0, w, h),
             ImageLockMode.WriteOnly,
             PixelFormat.Format24bppRgb);
         Marshal.Copy(result, 0, res_data.Scan0, bytes);
         res_img.UnlockBits(res_data);
         return res_img;
}I hope this tutorial was helpful in gaining better understading on texture segmentation.
You can also download the demo project and try it out yourself.