How To Make Thinning In Image Processing Work With C#
Thinning is a morphological operation in image processing, which eats away at the foregorund pixels and leaves only lines shaping objects.
Filter by Category
Thinning is a morphological operation in image processing, which eats away at the foregorund pixels and leaves only lines shaping objects.
Convex hull in image processing is a morphological operation, where we encapsulate a shape or and object in an image into a convex shape.
Hit or miss transform is a morphological process for shape detection. We need to use two different structuring elements to find the shapes.
Extraction of connected components in image processing is a morphological process, where we isolate object to a separate image.
Hole filling in image processing is a morphological operation that fills in shapes of black pixels surrounded by white pixels.
Boundary extraction in image processing is one of the basic morphological algorithms with which we extract only the outline of shown objects.
Opening and closing in image processing are morphological operations which are basically sequences of erosion and dilation operations.
Image dilation is one of the fundamental morphological processes, which we demonstrate it here in C# programming language.
Image erosion is one of the fundamental morphological operations and this tutorial explains how it works and demonstrates it in C#.
This tutorial shows how image watermarking works by implementing it with C# and we describe various purposes that watermarks have as well.
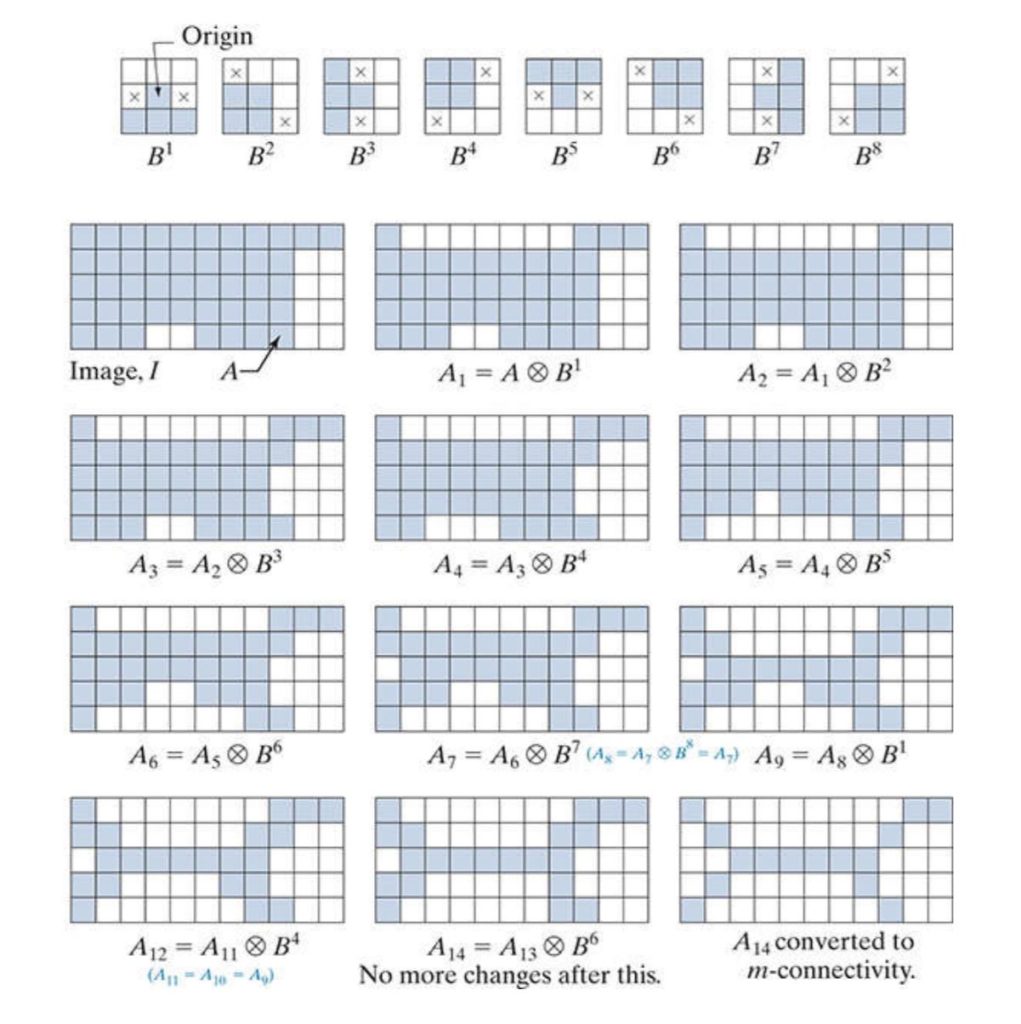
Thinning is a morphological operation in image processing, which removes foreground pixels from objects in the images. Furthermore, what it leaves behind are lines that still resemble the objects.
Morphological processes are non-linear operations, which means that their results depend on the shapes. So far, we worked only with binary images in morphology and we’re going to do so in this tutorial as well.
Binary images carry only two different intensities, which produce pixels with either black or white color. In morphological terms, we’ll also call them foreground and background pixels.
When we process images with morphological operations, we divide pixels into sets. Therefore, we end up with two sets and we apply these operations across these whole sets. However, there are exceptions where we limit operations to certain objects, like hole filling operation.
In order to eat away at foreground pixels that represent obejcts in the image, we’ll need to apply hit or miss transform elements. But, the objects have different shapes of edges around it, so we will need to use multiple structuring elements to address this problem.
Structuring elements can also be viewed as kernels in convolution process. But they are not the same, since convolution is a linear operation, which involves multiplying and summing.
These structuring elements we’re going to use will detect if foreground and background values overlap. And once they do, we will set the pixel that overlaps in the center to background color – black. However, we need to apply this process in a sequence.
We will use 8 different structuring elements that will detect edges in 8 different positions, one for every 45 degrees turn. But it won’t be enough if we apply this sequence only once. We need to go through this sequence multiple times, in order to reach convergence.

Convergence simply represents, when we no longer apply anymore changes to the image. This way the results of thinning are usually just lines that briefly represent the objects.
I’ve written a function that applies this operation to a binary image. However, the structuring elements that I used in it, are just two dimensional arrays of 1s and 0s. But in any case, I’ll leave a link to the whole demo project at the end of the post.
public static Bitmap Thinning(this Bitmap image)
     {
         int w = image.Width;
         int h = image.Height;

         BitmapData image_data = image.LockBits(
             new Rectangle(0, 0, w, h),
             ImageLockMode.ReadOnly,
             PixelFormat.Format8bppIndexed);

         int bytes = image_data.Stride * image_data.Height;
         byte[] buffer = new byte[bytes];

         Marshal.Copy(image_data.Scan0, buffer, 0, bytes);
         image.UnlockBits(image_data);

         int[][,] se =
         {
             Structuring_Element.left,
             Structuring_Element.topleft,
             Structuring_Element.top,
             Structuring_Element.topright,
             Structuring_Element.right,
             Structuring_Element.bottomright,
             Structuring_Element.bottom,
             Structuring_Element.bottomleft
         };

         int diff = 1;

         while (diff > 0)
         {
             diff = 0;
             for (int i = 0; i < se.Length; i++)
             {
                 for (int x = 1; x < w - 1; x++)
                 {
                     for (int y = 1; y < h - 1; y++)
                     {
                         int position = x + y * image_data.Stride;
                         List<bool> change = new List<bool>();
                         for (int kx = -1; kx < 2; kx++)
                         {
                             for (int ky = -1; ky < 2; ky++)
                             {
                                 int se_pos = position + kx + ky * image_data.Stride;
                                 int se_opp = position + (kx * -1) + (ky * -1) * image_data.Stride;
                                 if (se_pos == position)
                                 {
                                     continue;
                                 }

                                 if (buffer[se_pos] > 0 && se[i][kx+1,ky+1] == 1 && buffer[se_opp] == 0 && se[i][(kx* -1) + 1, (ky*-1) + 1] == 0)
                                 {
                                     change.Add(true);
                                 }
                             }
                         }

                         if (change.Count == 3 && buffer[position] > 0)
                         {
                             buffer[position] = 0;
                             diff++;
                         }
                     }
                 }
             }
         }

         Bitmap res_img = new Bitmap(w, h);
         BitmapData res_data = res_img.LockBits(
             new Rectangle(0, 0, w, h),
             ImageLockMode.WriteOnly,
             PixelFormat.Format8bppIndexed);
         Marshal.Copy(buffer, 0, res_data.Scan0, bytes);
         res_img.UnlockBits(res_data);

         return res_img;
}Thinning is a process, where I included elements from other morphological operations. It serves as a sor of stepping stone to a better understanding of processes I’ll cover in the future.
I hope this guide was helpful and I’m also including the link to the whole demo project, which you can try it out yourself. Just remember to use binary images with it.