Morphological Processes
How To Make Image Dilation Work With C#
Image dilation is one of the fundamental morphological processes, which we demonstrate it here in C# programming language.
Filter by Category
Image dilation is one of the fundamental morphological processes, which we demonstrate it here in C# programming language.
Image erosion is one of the fundamental morphological operations and this tutorial explains how it works and demonstrates it in C#.
This tutorial shows how image watermarking works by implementing it with C# and we describe various purposes that watermarks have as well.
This tutorial shows how to use colors for image segmentation applied in C#. I explain the basics of applying it in different color spaces.
This color image smoothing and sharpening tutorial shows how to apply convolution for blurring and sharpening images with C#.
This guide shows how to apply color histogram equalization with iterative equalization of the image by using nth root or nth power.
Color balancing is one of the processes we use to adjust images, which are either on the weaker or heavier side for any of the color channels.
This guide shows how to apply image tone corrections for flat, dark and light images. The purpose of it is to adjust brightness and contrast.
Color slicing is a color image processing technique, which only shows colors in a certain color space making objects stand out.
False color or pseudocolor image processing coupled with intensity slicing is useful for emphasizing shapes that might be hidden to our eyes.
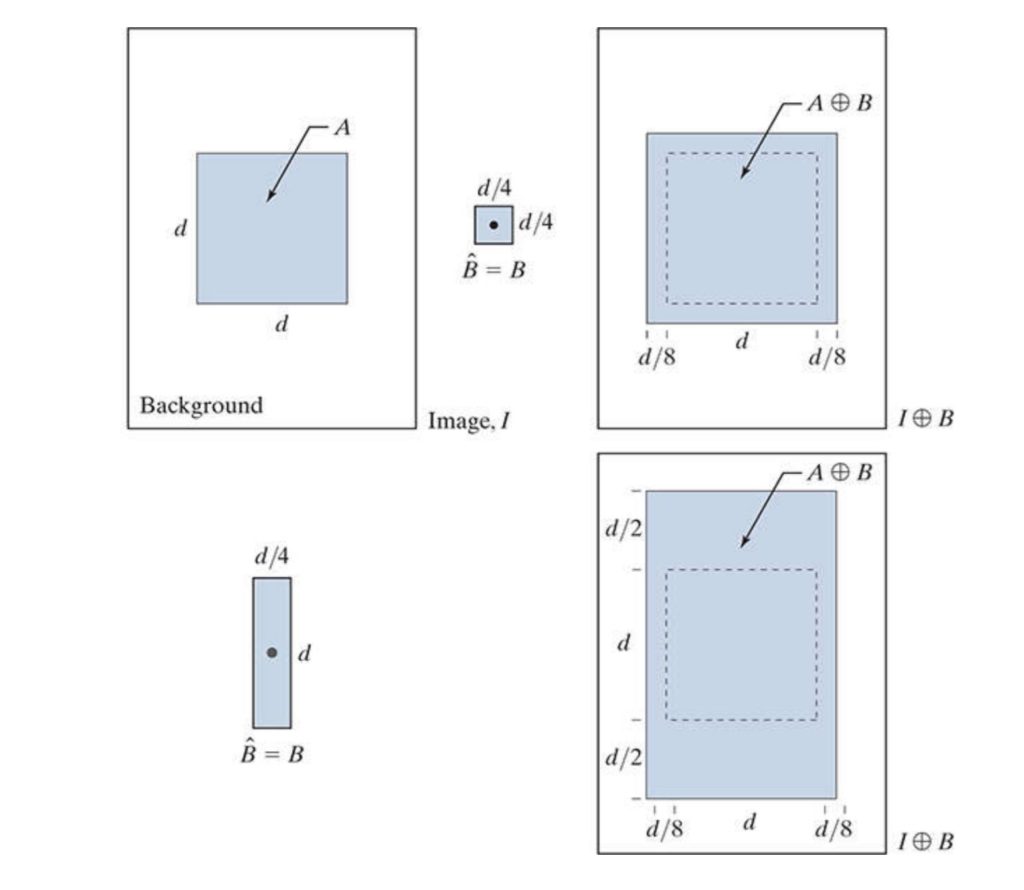
Image dilation si one of the fundamental morphological processes. In fact, it’s the other side of the coin in comparison to erosion. Unlike erosion, which shrinks objects represented by foreground pixels, dilation grows or thickens them.
With morphological operations we divide image values into sets. For the sake of simplicity, we’ll demonstrate this process with binary images. These kind of images have only 2 colors, white or black. Therefore we’ll denote white pixels as foreground pixels and black pixels as background pixels.
Image dilation is based on reflecting the structuring element and sliding it across the whole image. As it is with erosion, it’s intuitive to think about structuring elements as convolution kernels.
However, image dilation is a set operation, which means that it’s a nonlinear operation. While convolution involves multiplying pixel values with kernel values and summing them together making it a linear operation.
How does reflecting a structuring element work?
Simply put, we just rotate it 180 degrees, or in other words, put it upside down. This part is important when, we’re using asymmetric structuring element, where the position of it’s origin changes when we go through with this part.
Based on this origin we set other pixels different color. Once our origin overlaps a white pixel, we set all other pixels, that are covered by the structuring element white. Furthermore, we repeat this process by sliding structuring element across input image.
Depending on the size and shape of the structuring element, we can get differently dilated foreground objects. We can also set custom shapes inside structuring element as well. While they are square, we can still set which position will set a pixel white and which won’t.
One of the simplest application of this process is to dilate low resolution text to bridge gaps within letters. This also goes well with smoothing operation to make text easier to read.
I’ve written a function that demonstrates this process. However, this is the simplest possible demo I could come up with.
One thing to keep in mind is, that the structuring element I used here is symmetrical, so there was no need to reflect it. And another is that all of the values inside the structuring element are set to create foreground pixels.
public static Bitmap Dilation(this Bitmap image, int se_dim)
     {
         int w = image.Width;
         int h = image.Height;

         BitmapData image_data = image.LockBits(
             new Rectangle(0, 0, w, h),
             ImageLockMode.ReadOnly,
             PixelFormat.Format24bppRgb);

         int bytes = image_data.Stride * image_data.Height;
         byte[] buffer = new byte[bytes];
         byte[] result = new byte[bytes];

         Marshal.Copy(image_data.Scan0, buffer, 0, bytes);
         image.UnlockBits(image_data);

         int o = (se_dim - 1) / 2;
         for (int i = o; i < w - o; i++)
         {
             for (int j = o; j < h - o; j++)
             {
                 int position = i * 3 + j * image_data.Stride;
                 for (int k = -o; k <= o; k++)
                 {
                     for (int l = -o; l <= o; l++)
                     {
                         int se_pos = position + k * 3 + l * image_data.Stride;
                         for (int c = 0; c < 3; c++)
                         {
                             result[se_pos + c] = Math.Max(result[se_pos + c], buffer[position]);
                         }
                     }
                 }
             }
         }

         Bitmap res_img = new Bitmap(w, h);
         BitmapData res_data = res_img.LockBits(
             new Rectangle(0, 0, w, h),
             ImageLockMode.WriteOnly,
             PixelFormat.Format24bppRgb);
         Marshal.Copy(result, 0, res_data.Scan0, bytes);
         res_img.UnlockBits(res_data);
         return res_img;
     }
I hope this tutorial was helpful and instructive.
You can also download the whole demo project and try it out yourself.