How To Make Hole Filling In Image Processing Work In C#
Hole filling in image processing is a morphological operation that fills in shapes of black pixels surrounded by white pixels.
Filter by Category
Hole filling in image processing is a morphological operation that fills in shapes of black pixels surrounded by white pixels.
Boundary extraction in image processing is one of the basic morphological algorithms with which we extract only the outline of shown objects.
Opening and closing in image processing are morphological operations which are basically sequences of erosion and dilation operations.
Image dilation is one of the fundamental morphological processes, which we demonstrate it here in C# programming language.
Image erosion is one of the fundamental morphological operations and this tutorial explains how it works and demonstrates it in C#.
This tutorial shows how image watermarking works by implementing it with C# and we describe various purposes that watermarks have as well.
This tutorial shows how to use colors for image segmentation applied in C#. I explain the basics of applying it in different color spaces.
This color image smoothing and sharpening tutorial shows how to apply convolution for blurring and sharpening images with C#.
This guide shows how to apply color histogram equalization with iterative equalization of the image by using nth root or nth power.
Color balancing is one of the processes we use to adjust images, which are either on the weaker or heavier side for any of the color channels.
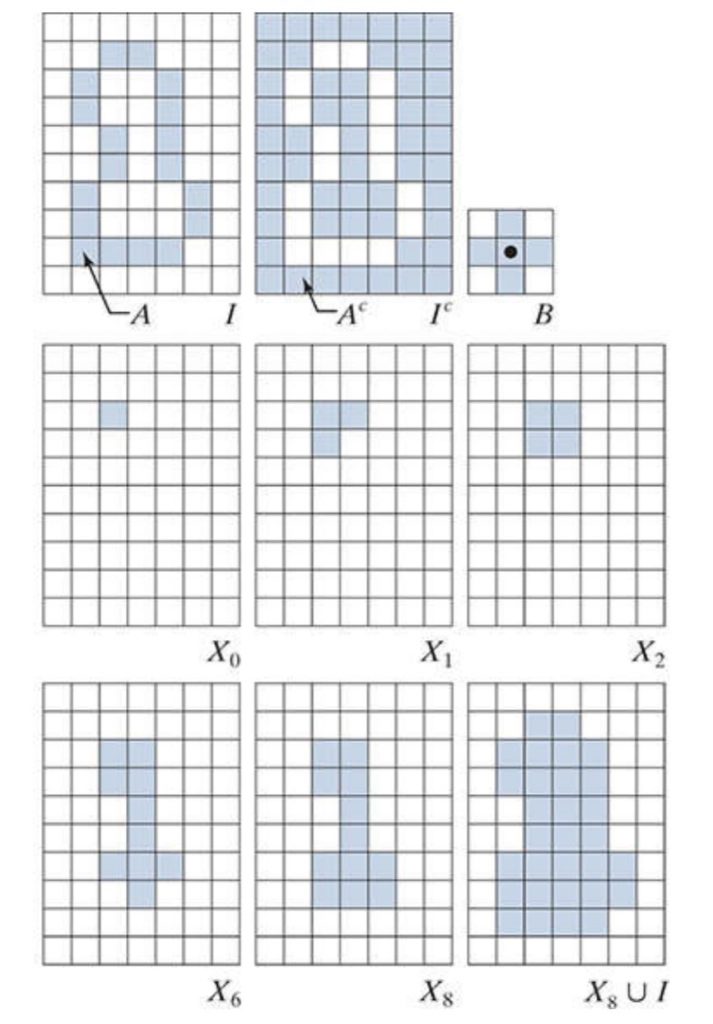
Hole filling or region filling in image processing is a morphological operation. Furthermore, as its name might suggest, it fills holes inside hollow shapes. We define these hollow shapes or holes as background pixels enclosed by a border of foreground pixels.
We will talk about how to apply this process to binary images. Therefore, we will work with images that consist of pixels of either black or white pixels. Furthermore, we will call white pixels foreground pixels and black pixels background pixels.
All morphological processes are based on two fundamental operations, which are erosion and dilation. In our case here, hole filling is based on dilation process, which basically grows objects represented by foreground pixels.
We deal with various operations in image processing and hole filling is one of the non-linear, which means that its result depends only on positions of foreground and background pixels. Therefore, in morphological processes in general, we divide pixels into sets.
Firstly, we need to set a point inside the shape we want to fill with foreground pixels. From there, we dilate this point so many times, that it fills the shape. However, to control the dilation, we need to dilate only the pixels inside the border so we set a condition that does that for us.
Because dilation affects every foreground pixel in the image, we need to apply this dilation process on a separate image. Therefore, we position these filling pixels where the shape on the input image is and combine the images at the end.

This is the simplest way that I could demonstrate this process. However it does have a downside, which is long computing time. The larger the shape we want to fill, more dilations it needs to perform and more time it will take to do it.
I’ve tried to make the following function as understandable as possible with comments.
public static Bitmap FillHoles(this Bitmap image, int start_x, int start_y)
     {
         int w = image.Width;
         int h = image.Height;

         BitmapData image_data = image.LockBits(
             new Rectangle(0, 0, w, h),
             ImageLockMode.ReadOnly,
             PixelFormat.Format24bppRgb);

         int bytes = image_data.Stride * image_data.Height;
         byte[] buffer = new byte[bytes];

         Marshal.Copy(image_data.Scan0, buffer, 0, bytes);
         image.UnlockBits(image_data);

         byte[] temp = new byte[bytes];
         byte[] result = new byte[bytes];

         //seed point
         for (int c = 0; c < 3; c++)
         {
             temp[start_x * 3 + start_y * image_data.Stride + c] = 255;
         }

         while (true)
         {
             //iterate across the image with structuring element
             for (int i = 1; i < w - 1; i++)
             {
                 for (int j = 1; j < h - 1; j++)
                 {
                     //position of the structuring element center
                     int position = i * 3 + j * image_data.Stride;
                     //set up structuring element
                     for (int k = -1; k < 2; k++)
                     {
                         for (int l = -1; l < 2; l++)
                         {
                             //position of pixel overlaped by structuring element
                             int se_pos = position + k * 3 + l * image_data.Stride;
                             if (Structuring_Element.Vals[k + 1, l + 1] == 1 && buffer[se_pos] < 255)
                             {
                                 for (int c = 0; c < 3; c++)
                                 {
                                     result[se_pos + c] = Math.Max(temp[position], result[se_pos]);
                                 }
                             }
                         }
                     }
                 }
             }

             int difference = 0;
             for (int i = 0; i < bytes; i++)
             {
                 if (result[i] != temp[i])
                 {
                     temp[i] = result[i];
                     difference++;
                 }
             }
             if (difference == 0)
             {
                 break;
             }
         }

         //combine filling pixels with input image
         for (int i = 0; i < bytes; i++)
         {
             if (result[i] < buffer[i])
             {
                 result[i] = buffer[i];
             }
         }

         Bitmap res_img = new Bitmap(w, h);
         BitmapData res_data = res_img.LockBits(
             new Rectangle(0, 0, w, h),
             ImageLockMode.WriteOnly,
             PixelFormat.Format24bppRgb);
         Marshal.Copy(result, 0, res_data.Scan0, bytes);
         res_img.UnlockBits(res_data);

         return res_img;
}I hope this guide was useful in understanding the process of hole filling in image processing.
You can also download the demo project and try it out yourself.