How To Make Image Erosion Work With C#
Image erosion is one of the fundamental morphological operations and this tutorial explains how it works and demonstrates it in C#.
Filter by Category
Image erosion is one of the fundamental morphological operations and this tutorial explains how it works and demonstrates it in C#.
Erosion is a morphological process, where pixels at an object boundaries are removed. Erosion and dilation are a pair of basic morphological transformations, which are completely...
We will delve into morphological processing, more preciselly we’ll look into how image erosion works. Furthermore, erosion is one of the fundamental morphological operations.
Therefore, it’s going to act as a stepping stone for understanding other more complicated morphological operations. However, I’ll make sure to explain each process separately, so you won’t need to come back to this post.
When we’re working with morphological operations, we represent our image data differently as we would normally . What I mean by that is, we divide our image into sets.
For example, when we’re deling with binary images, which only have two colors, black or white, we have sets of foreground and background pixels. That being said, we’re not limited to processing only these kind of images with this technique.
However in this guide, we’ll focus on applying erosion on binary images as it’s the simplest way of demonstrating it. Morphological processes work by sliding structuring element across the image, which is similar to kernel in convolution.
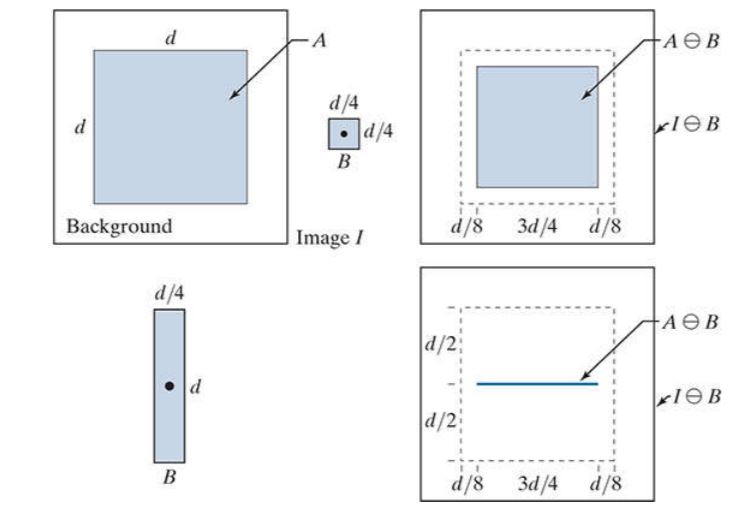
Therefore, it’s more intuitive, to explain it as we were doing convolution. With image erosion, we have structuring element or kernel that has all true values or in other words, max 8-bit value, 255. We put it on top of the image and if all values cover white pixels, we set the center or origin pixel white on the resulting image.
The set of foreground pixels usually represent an object in the image. But, because we take all foreground pixels into one set, it can also represent multiple disjoint objects.
As we said before, we put structuring element on top of image and compare if all white pixels coincide. And if they do, we set white pixel on the resulting image where the center position of the structuring element is on the input image.
However, these structuring elements can be of different shapes, which will erode foreground pixels differently.

We can view image erosion as a morphological filtering operation, with which we remove details smaller than structuring element.
I’ve written a function that demonstrates this process with a square structuring element.
public static Bitmap Erosion(this Bitmap image, int se_dim)
     {
         int w = image.Width;
         int h = image.Height;

         BitmapData image_data = image.LockBits(
             new Rectangle(0, 0, w, h),
             ImageLockMode.ReadOnly,
             PixelFormat.Format24bppRgb);

         int bytes = image_data.Stride * image_data.Height;
         byte[] buffer = new byte[bytes];
         byte[] result = new byte[bytes];

         Marshal.Copy(image_data.Scan0, buffer, 0, bytes);
         image.UnlockBits(image_data);

         int o = (se_dim - 1) / 2;
         for (int i = o; i < w - o; i++)
         {
             for (int j = o; j < h - o; j++)
             {
                 int position = i * 3 + j * image_data.Stride;
                 byte val = 255;
                 for (int x = -o; x <= o ; x++)
                 {
                     for (int y = -o; y <= o; y++)
                     {
                         int kposition = position + x * 3 + y * image_data.Stride;
                         val = Math.Min(val, buffer[kposition]);
                     }
                 }
                 for (int c = 0; c < 3; c++)
                 {
                     result[position + c] = val;
                 }
             }
         }

         Bitmap res_img = new Bitmap(w, h);
         BitmapData res_data = res_img.LockBits(
             new Rectangle(0, 0, w, h),
             ImageLockMode.WriteOnly,
             PixelFormat.Format24bppRgb);
         Marshal.Copy(result, 0, res_data.Scan0, bytes);
         res_img.UnlockBits(res_data);
         return res_img;
}I hope this tutorial was helpful in understanding image erosion.
You can also download the demonstration project yourself and try it out or modify it.