How To Color Balancing In Images With C#
Color balancing is one of the processes we use to adjust images, which are either on the weaker or heavier side for any of the color channels.
Filter by Category
This guide about color balancing serves as a continuation of a post where I covered tone correction. Furthermore, we should apply color balancing techniques only after we adjust the tonal range.
First step for applying any transformations, we need to determine color imbalances by using color spectrometer. But if you want to just eyeball it, you can do that too. However, a good practice by doing it that way is to focus on skin tones, since we’re highly perceptive of proper skin color by nature.
For example, if we’re dealing with an image where people have slightly blueish colored skin, we can be fairly certain that the image is heavy in cyan.
Main difference between color corrections and tone corrections is that we can apply transformations to color channels separately and this way balance colors. Furthermore, we will see how to do this with gamma correction transformation on CMY color channels.
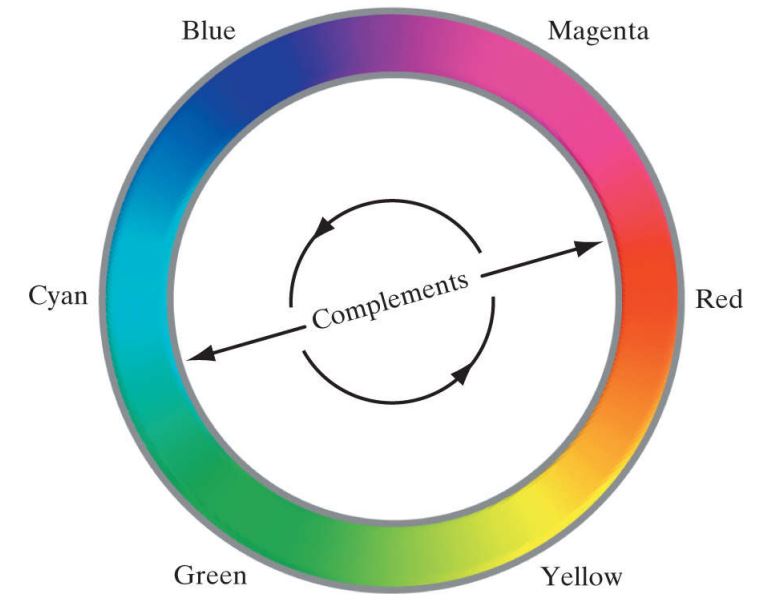
There are essentially two ways we can control color balance on an image. One is to decrease complementary color and the other is to increase neighbouring colors on color spectrum wheel.

In our example, we’ll be blancing colors by applying power-law transformations in CMY color channels. Furthermore, CMY stands for cyan, magenta and yellow color channels, which are primary colors of pigment.
Now, let’s not get confused here. There is a difference between colors of light and colors of pigment. Not so much in the sense they look different, but more in the purpose we use them for.
So to clarify, while CMY colors are primary colors of pigment, they are also the secondary colors of light. The throne for primary colors of light still belongs to RGB colors.
CMY colors are useful for for printers and other devices which put ink on an object. However, for practical applications we need to use CMYK color model, since mixing CMY pigments in practice doesn’t result in pure black color. The K channel we added to CMY is for black color only, because we use it the most for printing text.
Following code demonstrates how to adjust cyan color channel values using the same formula we used in gamma correction guide. Also mind that we need to convert values from RGB to CMY color model, before we start balancing the colors.
Converting the values from RGB to CMY is rather simple. We just need to subtract normalized RGB values from 1. Red values will convert to cyan, green to magenta and blue to yellow.
public static Bitmap AdjustCyan(this Bitmap image, double y)
         {
             int w = image.Width;
             int h = image.Height;
         BitmapData image_data = image.LockBits(
             new Rectangle(0, 0, w, h),
             ImageLockMode.ReadOnly,
             PixelFormat.Format24bppRgb);
         int bytes = image_data.Stride * image_data.Height;
         byte[] buffer = new byte[bytes];
         byte[] result = new byte[bytes];
         Marshal.Copy(image_data.Scan0, buffer, 0, bytes);
         image.UnlockBits(image_data);
         for (int i = 0; i < bytes; i+=3)
         {
             //convert from RGB to CMY - sequence of stored pixel values is BGR
             //so we pick every third number for red color channel
             double normalized = (double)buffer[i + 2] / 255;
             double cyan = Math.Pow(1d - normalized, y);
             result[i + 2] = (byte)((1d - cyan) * 255);
             for (int j = 0; j < 2; j++)
             {
                 result[i + j] = buffer[i + j];
             }
         }
         Bitmap res_img = new Bitmap(w, h);
         BitmapData res_data = res_img.LockBits(
             new Rectangle(0, 0, w, h),
             ImageLockMode.WriteOnly,
             PixelFormat.Format24bppRgb);
         Marshal.Copy(result, 0, res_data.Scan0, bytes);
         res_img.UnlockBits(res_data);
         return res_img;
}As we mentioned earlier, this color balancing tutorial is just a continuation of the tone correction guide. Furthermore, these processes go well hand in hand as we usually need to use them both together.
You can also download the whole project and try it out yourself. I hope this guide was helpful and if you want to tune in for more, you can leave a like on epochabuse Facebook page.