How To Adjust Image Tone – C# Guide
This guide shows how to apply image tone corrections for flat, dark and light images. The purpose of it is to adjust brightness and contrast.
Filter by Category
This guide shows how to apply image tone corrections for flat, dark and light images. The purpose of it is to adjust brightness and contrast.
Color slicing is a color image processing technique, which only shows colors in a certain color space making objects stand out.
False color or pseudocolor image processing coupled with intensity slicing is useful for emphasizing shapes that might be hidden to our eyes.
This guide shows how to convert RGB to HSI image data and also how to convert it back from HSI to RGB to make it displayable on screen.
Adaptive median filter is much more effective at removing impulse noise, also known as salt and pepper noise, than traditional median filter.
Adaptive local noise reduction filters are useful for processing images that have too much noise to deal with with other simpler filters.
Alpha trimmed mean filter is a combination of mean filters and order-statistic filters. This guide shows how to use them with C#.
Midpoint filter is a order-statistic filter and we use it to process image data in spatial domain. This guide shows how to make it with C#.
Max and min filter is one of the order-statistic filter we can use to process image data in spatial domain. This tutorial shows it with C#.
Median filter is one of the order-statistic filters for processing image data in spatial domain. This guide shows how to apply it with C#.
Before we begin applying any color corrections to our image, we first need to adjust image tone. To be more precise, we need to fix its tonal range. In other words, we need to fix the general distribution of color intensities.
Furthermore, adjusting tonal range is a process, where we select intensity transformations by observation and experimentation. Therefore, it depends on satisfaction of the person who’s adjusting it.
When we’re applying transformations for tone correction, we actually don’t change the colors. Therefore, we need to apply the same transformation on all color channels. So, the main purpose for correcting tonal range of the image is adjusting brightness and contrast of the image.
Furthermore, these corrections will result in images with maximum details over suitable range of color intensities. For example, we can see how histogram equalization, which we use on grayscale images, produce images that display details we could easily overlook without it.
For these kind of corrections, I used the same transformation as I used in tutorial for gamma correction. In other words, following examples are upgrades of that function, making them more useful for practical applications.
We need to adjust contrast for these kind of images, which makes following operation the most complex among the three we’re going to describe.
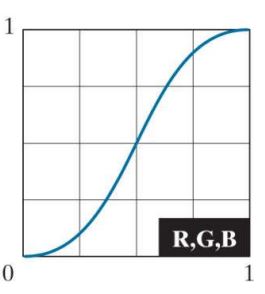
For transformation we’re going to apply here, we have to darken first half of intensities and brighten the other. In order to do that we will apply two different gamma correction transformations for the whole image. Following graph shows transformation curve in RGB spectrum.

And of course, let’s take a look at the code which applies the following transformation as well.
public static Bitmap FlatCorrection(this Bitmap image)
     {
         int w = image.Width;
         int h = image.Height;
         BitmapData image_data = image.LockBits(
             new Rectangle(0, 0, w, h),
             ImageLockMode.ReadOnly,
             PixelFormat.Format24bppRgb);
         int bytes = image_data.Stride * image_data.Height;
         byte[] buffer = new byte[bytes];
         byte[] result = new byte[bytes];
         Marshal.Copy(image_data.Scan0, buffer, 0, bytes);
         image.UnlockBits(image_data);
         double y = 2;
         for (int i = 0; i < bytes; i++)
         {
             if (buffer[i] < 128)
             {
                 double normalized = (double)buffer[i] / 128;
                 result[i] = (byte)(Math.Pow(normalized, y) * 128);
             }
             else
             {
                 double normalized = ((double)buffer[i] - 128) / 128;
                 result[i] = (byte)((Math.Pow(normalized, 1/y) * 128) + 128);
             }
         }
         Bitmap res_img = new Bitmap(w, h);
         BitmapData res_data = res_img.LockBits(
             new Rectangle(0, 0, w, h),
             ImageLockMode.WriteOnly,
             PixelFormat.Format24bppRgb);
         Marshal.Copy(result, 0, res_data.Scan0, bytes);
         res_img.UnlockBits(res_data);
         return res_img;
}Okay, so now that we already know how to apply both of this transformations at once, correcting with one at a time will be a piece of cake.
We basically use one function for both of these operations, the only difference being the variable to which we raise normalized intensity function. If the variable is below 1, we will end up with a lighter image and if it’s above 1 we will darken it.
public static Bitmap LightCorrection(this Bitmap image)
     {
         int w = image.Width;
         int h = image.Height;
         BitmapData image_data = image.LockBits(
             new Rectangle(0, 0, w, h),
             ImageLockMode.ReadOnly,
             PixelFormat.Format24bppRgb);
         int bytes = image_data.Stride * image_data.Height;
         byte[] buffer = new byte[bytes];
         byte[] result = new byte[bytes];
         Marshal.Copy(image_data.Scan0, buffer, 0, bytes);
         image.UnlockBits(image_data);
         double y = 2;
         for (int i = 0; i < bytes; i++)
         {
             double normalized = (double)buffer[i] / 255;
             result[i] = (byte)(Math.Pow(normalized, y) * 255);
         }
         Bitmap res_img = new Bitmap(w, h);
         BitmapData res_data = res_img.LockBits(
             new Rectangle(0, 0, w, h),
             ImageLockMode.WriteOnly,
             PixelFormat.Format24bppRgb);
         Marshal.Copy(result, 0, res_data.Scan0, bytes);
         res_img.UnlockBits(res_data);
         return res_img;
}I hope this guide on image tone corrections was helpful. There are plenty more image processing tutorials with C# programming language available on this blog.
If you want to test the code above, you can download the demo project I’ve created here for free.