Morphological Reconstruction
How To Make Geodesic Dilation And Erosion In Morphology
Geodesic dilation and erosion are fundamental morphological reconstruction algorithms which yield the same result if left to converge.
Filter by Category
Geodesic dilation and erosion are fundamental morphological reconstruction algorithms which yield the same result if left to converge.
Pruning in image processing is a morphological operation for removing spurs. It serves mainly as a post processing technique for cleaning up.
Skeletonization is a morphological process in image processing, which extracts the center lines of all shapes, which look like their skeleton
Thickening is a morphological operation in image processing, which adds foreground or white pixels to objects in order to thicken them.
Thinning is a morphological operation in image processing, which eats away at the foregorund pixels and leaves only lines shaping objects.
Convex hull in image processing is a morphological operation, where we encapsulate a shape or and object in an image into a convex shape.
Hit or miss transform is a morphological process for shape detection. We need to use two different structuring elements to find the shapes.
Extraction of connected components in image processing is a morphological process, where we isolate object to a separate image.
Hole filling in image processing is a morphological operation that fills in shapes of black pixels surrounded by white pixels.
Boundary extraction in image processing is one of the basic morphological algorithms with which we extract only the outline of shown objects.
Geodesic dilation and erosion are fundamental operations in morphological reconstruction branch. Furthermore, these processes have a special spin on basic dilation and erosion. They enable us reconstruction of specific shapes in the image.
However, we’re still dealing with binary images here. In case you’re new here, binary images are images that hold either black or white pixels. In other words, we can divide these images to two sets, one for foreground pixels and other for background pixels.
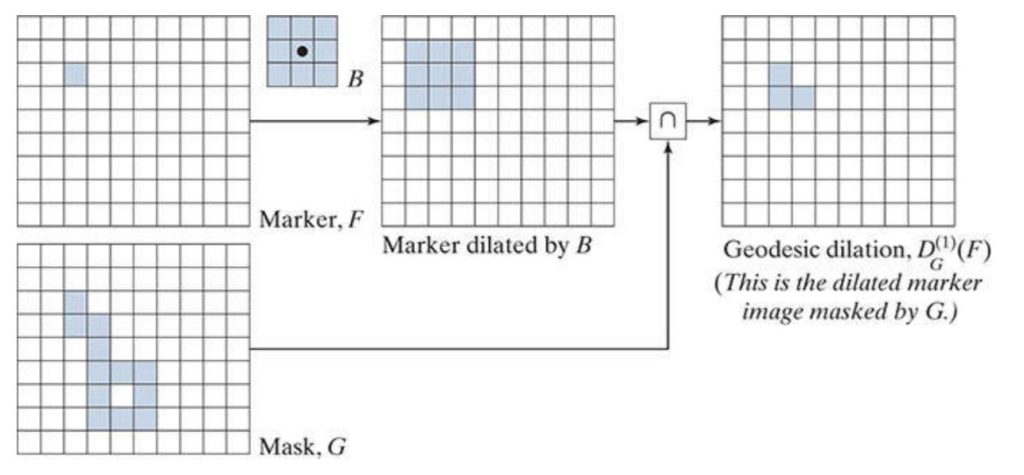
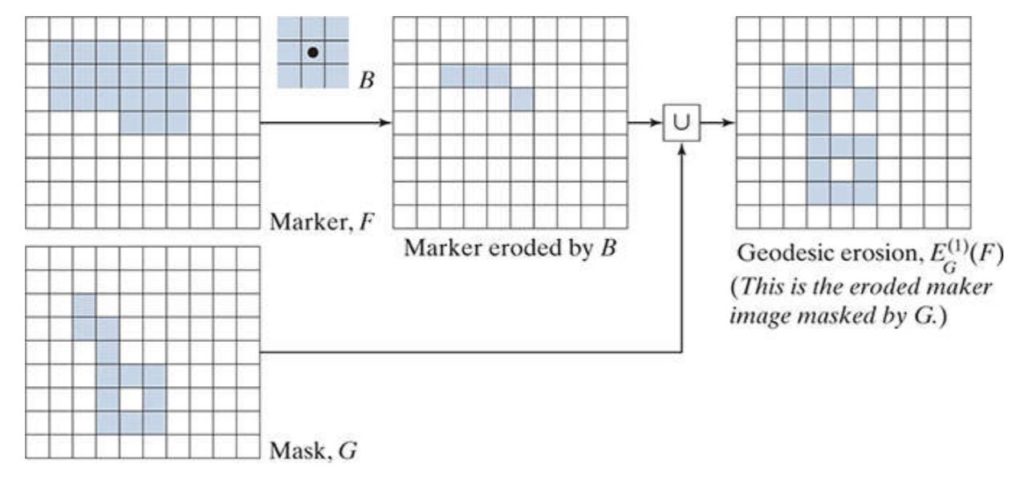
The special thing about these two processes is that we use two images for each of them instead of one. Similarly to basic versions, we need an image to apply either dilation or erosion on it. Together with this image, we also need a masking image, which will limit the growth or shrinkage of the resulting image.
With geodesic dilation, we need to acquire the intersection between masking image and dilated image. As we mentioned before, masking image will limit the way successive dilations grow.
On the other hand, geodesic erosion is a morphological dual to dilation. Therefore, both processes will eventually converge to the same result. However, with erosion, we take away foreground pixels, so what we’re looking for is the union between input and masking image.
Both operations converge after a finite number of steps, which yield a resulting image that is identical to the masking image.
One example of geodesic dilation use was in the pruning tutorial post on this blog. We used it to reconstruct a part of handwritten letters, we removed in the thinning process. I recommend you check it out to learn more about the process.
Although I make a demo project for each of the process I describe on this blog, I will only post a segment that applies geodesic dilation on this one. However, it should give you an idea of how to implement the erosion as well.
public static byte[] Dilate(this byte[] buffer, byte[] limiter, int w, int h)
     {
         byte[] result = buffer;

         for (int x = 1; x < w - 1; x++)
         {
             for (int y = 1; y < h - 1; y++)
             {
                 int position = x + y * w;
                 byte val = 15;
                 for (int kx = -1; kx < 2; kx++)
                 {
                     for (int ky = -1; ky < 2; ky++)
                     {
                         int se_pos = position + kx + ky * w;
                         val = Math.Max(val, buffer[se_pos]);
                     }
                 }

                 if (limiter[position] > 0)
                 {
                     result[position] = val;
                 }
             }
         }

         return result;
}I hope this post helped you understand how geodesic dilation and erosion in image processing work.